
Using Home Assistant as Universal Remote Control
|
Using Home Assistant as Universal Remote Control
As part of an ongoing home automation project I want to be able to control a media center consisting of
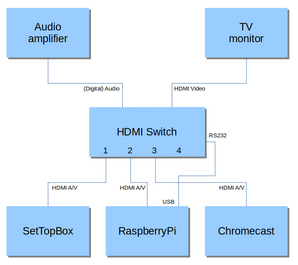
- Arris 2952 Set Top Box for XS4All/KPN internet television
- RaspberryPi with OSMC, to play videos
- ChromeCast
- Philips 43PFS5525 TV, used as video monitor
- SMSL DA18, used as audio amplifier
- Marmitek Connect 621 to switch HDMI and audio
Currently these devices are controlled by a Logitech Harmony 650 Remote, but this device is showing its age. Moreover, it requires a Windows computer for programming and, last but not least, I cannot really control what it does.
Hardware
After a bit of investigating I decided to buy a Broadlink RM mini3 Universal Remote. It is said to work with almost all devices, and has a nice HomeAssistant integration.

To control the devices programmatically, from Home Assistant, without using the Broadlink cloud, I need to have the Broadlink codes for the commands. For example, to send the POWER command to the Philips TV requires the following Home Assistant service call:
      - service: remote.send_command
        target:
          entity_id: remote.bedroom
        data:
          command: b64:JgAcAB0dHB44HhweGx4cHR06HB0cHhwdHB8bHhwADQUAAAAAAAAAAAAAAAA=
Broadlink supports a facility to learn codes from the remote, in which case it becomes more user friendly:
      - service: remote.send_command
        target:
          entity_id: remote.bedroom
        data:
          device: tv
          command: power
However, learning codes is a bit tedious and requires patience and concentration. On a breadboard I connected a LED receiver that I bought some years ago for another project to an ESP8266 with Tasmota (the ‘IR’ build with all kinds of IR protocols built in) so I could see the signals coming in. For example, this is the result of pressing the Input1 button for the HDMI switch:
{"Protocol":"NEC", "Bits":32,"Data":"0x40BF7B84","DataLSB":"0x2FDDE21","Repeat":0}
Some commands were not understood, and I noticed while learning commands that there is often garbage included.
After learning several commands and setting up a prototype remote dashboard in Home Assistant I tried the Broadlink with the actual media center. It turned out that one of the devices, the Arris set top box, failed to obey the learned commands. Further investigation revealed that the infra-red remote control for this device communicates on 56kHz, and the Broadlink RM mini3 supports only 38kHz. So far the slogan it works with “almost all devices”…
Actually the lack of support for other frequencies than 38kHz is both suprising and disturbing. 56kHz remotes are very common and have been for over a decade.
Hardware
After a lot of browsing on the interwebs I finally found out that the common problem with these infra-red frequences is on the decoding side but that most common LEDs are capable of sending signals at most frequencies. So I decided to try it on the ESP8266.
For more details on setting up a EPS8266 with Tasmota for infra-red communication, see e.g. the Tasmota docs.
As I already expected, my IR decoder did not understand the 56 kHz signals for the Arris. Fortunately, Tasmota also supports the sending of raw signals. Basically you just tell Tasmota to send pulses of specific durations on a given frequency. Would that work?
But how to get the raw codes necessary? A lot of browsing later I found a LIRC config file for the Motorola VIP 1853, which is the same device as the Arris 2952. Reverse engineering a Python program I had found earlier, pronto2broadlink, I could finally create the required data for the remote control.
I tried it on the breadboard and, indeed, it worked!
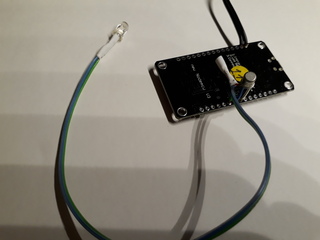
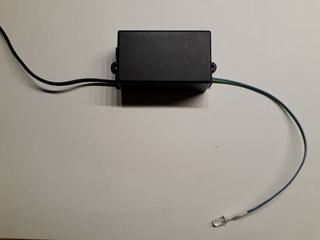
The parts soldered on a NodeMCU board and mounted in a small case.

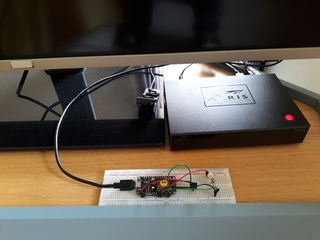
Final setup. Only the led is visible.
The blue part is the top of the door of the television cabinet.
The red spots indicate the IR receivers of the TV (top) and Arris (right). At the left is an IR extender that transports the signals into the cabinet to the SMSL and Marmitec.
Home Assistant
The design of the remote control in Home Assistant follows the principle of activities, just like the Harmony remotes.
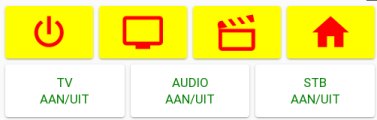
Initially it shows a couple of activities to choose from: turn everything off, watch television, watch a video, or go to the home screen.
Assuming everything is turned off, pressing the Television button will switch on the TV, the set top box and the amplifier, and set the HDMi switch to its first input.
Unfortunately these devices do not have explicit power on and power off commands, just power toggles. The three individual power on/off buttons for the television, amplifier and set top box are for emergency cases, where not all devices are ‘in sync’.
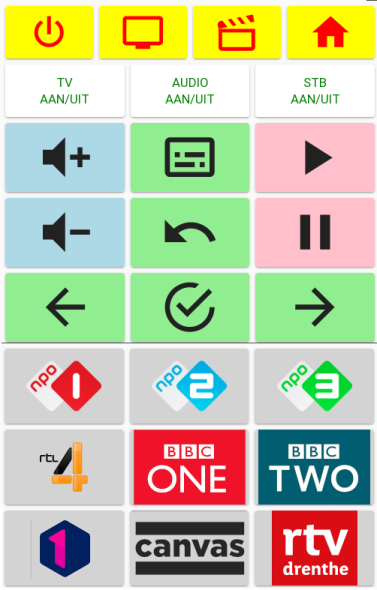
After selecting the Television activity, the display looks like this.
You can turn the volume (of the amplifier) up and down, pause and resume the tv program, enable teletext subtitles, and choose from the favourite channels.
Yes, these are the only channels we watch.
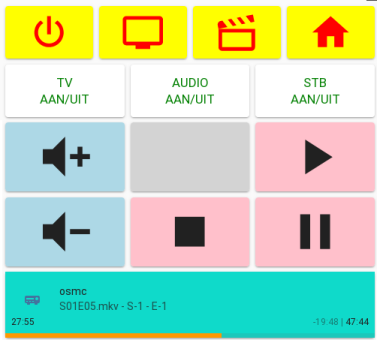
When selecting the Video activity, the display looks like this.
Note that in our case playing the actual video is handled by a separate remote-like app.
Software
The implementation consists of three parts:
- A package file with scripts and helpers;
- a dashboard file with the buttons;
- a PyScript helper program.
PyScript helper
This helper program implements a service ircontrol that can be called from Home Assistant. The program contains a (big!) table with the codes for all commands of all devices. A snippet of the table:
map = {
  'philips_tv': {
    'key_0' : '{"Protocol":"RC6", "Bits":20,"Data":"0x00","DataLSB":"0x00","Repeat":0}',
    'key_1' : '{"Protocol":"RC6", "Bits":20,"Data":"0x01","DataLSB":"0x80","Repeat":0}',
    'key_2' : '{"Protocol":"RC6", "Bits":20,"Data":"0x02","DataLSB":"0x40","Repeat":0}',
    ....
  },
  'hdmi_switch' : {
    'input1' : '{"Protocol":"NEC", "Bits":32,"Data":"0x40BF7B84","DataLSB":"0x2FDDE21","Repeat":0}',
    'input2' : '{"Protocol":"NEC", "Bits":32,"Data":"0x40BF5BA4","DataLSB":"0x2FDDA25","Repeat":0}',
     ....
  },
  'vip1853' : {
    'key_1' : '56,320,640,640,640,320,320,640,640,640,640,320,320,320,320,320,320,320,...',
    ....
  },
}
The (simplified) code of the service is trivial. It uses MQTT to pass the command to the Tasmota device:
@service
def ircontrol( device=None, command="power", remote="tasm11" ):

    devmap = map[device]
    for cmd in command.split(' '):
        payload = devmap[cmd]
        mqtt.publish( topic   = "cmnd/" + remote + "/irsend",
                      payload = payload )
Why a PyScript service? Well, mainly because I haven't found a good way to use such a big table from the Home Assistant YAML.
Package file
The package file defines a couple of input helpers to keep track of what devices are (assumed to be) on:
input_boolean:

  slaapkamer_tv:
    name: TV is on
  slaapkamer_stb:
    name: SetTop box is on
  slaapkamer_audio:
    name: Audio is on
Then there are scripts to select activities and change channels. For example, the script to select activity ‘Watch Television’:
script:

  activity_tv:

    sequence:

      # Power on TV, unless already on.
      - if:
          - condition: state
            entity_id: input_boolean.slaapkamer_tv
            state: "off"
        then:
          - service: pyscript.ircontrol
            data:
              device: tv
              command: power
          - service: input_boolean.turn_on
            target:
              entity_id: input_boolean.slaapkamer_tv

      # Power on STB, unless already on.
      - if:
          - condition: state
            entity_id: input_boolean.slaapkamer_stb
            state: "off"
        then:
          - service: pyscript.ircontrol
            data:
              device: stb
              command: power
          - service: input_boolean.turn_on
            target:
              entity_id: input_boolean.slaapkamer_stb

      # Power on Audio, unless already on.
      - if:
          - condition: state
            entity_id: input_boolean.slaapkamer_audio
            state: "off"
        then:
          - service: pyscript.ircontrol
            data:
              device: audio
              command: power
          - service: input_boolean.turn_on
            target:
              entity_id: input_boolean.slaapkamer_audio

      # Set HDMI switch to TV input.
      - service: pyscript.ircontrol
        data:
          device: hdmiswitch
          command: input1
A script to select a program channel:
script:

  channel_npo1:
    sequence:
      - service: pyscript.ircontrol
        data:
          device: stb
          command: key_0 key_0 key_1
And the script to enable teletext subtitles:
script:

  channel_subtitles:
    sequence:
      - service: pyscript.ircontrol
        data:
          device: stb
          command: text
      - delay: 1
      - service: pyscript.ircontrol
        data:
          device: stb
          command: key_8 key_8 key_8
Dashboard
The dashboard is built using custom button cards. One of the very nice features of this card is that it support card templates. This makes it easy to define templates for the different kinds of buttons.
For example, this is the template for a channel button:
button_card_templates:

  channel:
    variables:
      channel: npo1
    styles:
      name:
        - color: black
      card:
        - background-image: >
            [[[
            return 'url("/local/' + variables.channel + '.png")';
            ]]]
        - background-repeat: no-repeat
        - background-position: center
        - background-color: lightgrey
        - height: 100px
      icon:
        - width: 25%
    show_name: false
    tap_action:
      action: call-service
      service: '[[[ return "script.channel_" + variables.channel ]]]'
    hold_action:
      action: call-service
      service: '[[[ return "script.channel_" + variables.channel ]]]'
    icon: mdi:television
    show_icon: false
And this is an actual button:
  - type: custom:button-card
    template: channel
    variables:
      channel: npo1
    name: NPO1
The rest is a bunch of conditionals, horizontal and vertical stacks. For example:
      - type: conditional
        conditions:
          - entity: select.slaapkamer_media_center
            state: TV
        card:
          type: vertical-stack
          cards:
            - type: horizontal-stack
              cards:
                - type: custom:button-card
                  template: channel
                  variables:
                    channel: npo1
                  name: NPO1
                - type: custom:button-card
                  template: channel
                  variables:
                    channel: npo2
                  name: NPO2
                - type: custom:button-card
                  template: channel
                  variables:
                    channel: npo3
                  name: NPO3
And more…
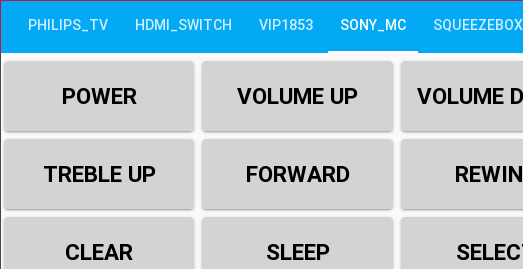
I wrote a small program that uses the big table and produces a series of dashboards with buttons for every command. So it is like having all the separate remote controls in one hand.
Conclusions
It is good to have eveything under control again.
Grabbing the mobile, unlock it, start the Home Assistant app and switch to the remote control dashboard takes too long. In particular, starting the app is slow.
Future plans
Implementing the remote in javascript so it can be called directly from the browser without Home Assistant.
© Copyright 2003-2023 Johan Vromans. All Rights Reserved.
articles/hass_remote/index.html last modified 19:22:17 19-Aug-2022